
I have been wanting to add a post divider and have been searching how to do this for a long time. I have come across about a hundred different sites explaining how "easy" it is to do blah, blah, blah............Essentially, you must find this code :
.post {
margin:.5em 0 1.5em;
border-bottom:1px dotted $bordercolor;
padding-bottom:1.5em;
}
This code does not exist on my template and has been driving me crazy. Each time I found a new "How To" it was exactly the same - find that code. So with bits and pieces taken from here and there, I have finally managed to give myself a post divider. Because I have had so much trouble doing it I wanted to share how I have done it for anyone out there who has been wanting one and also doesn't have that code.
*Step 1*
Find or create your divider.
You can either get one from crafty blogs like
Shabby Blogs or
Blogaholic Designs just to name a couple off the top of my head, but there are many out there. This is where google comes in handy. Some of the dividers you find on other blogs and sites will come will a
URL code that you will need to copy and paste. Other sites such as Shabby Blogs allows you to download their divider onto your computer, but then you must upload to your image storing site. I use Photobucket.
If you decided to create your own divider you will need to use a picture program such as
Photobucket, Fotoflexer or
Picnik. Again, there are many out there to choose from and they are usually free. I DO NOT recommend Fotoflexer. It is basically the same as Photobucket, but I find it 1000 times slower. Your divider will be saved and stored in Photobucket (or whichever program you prefer).
Sign into your Blogger account.
Either through the Dashboard or your main page:
Click on
DesignClick on
Edit HTMLIT IS HERE THAT YOU WILL / MAY WANT TO BACKUP YOUR TEMPLATEClick on
Expand Widget Templates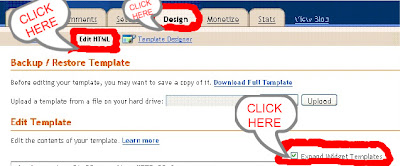
Scroll down until you find
/*Posts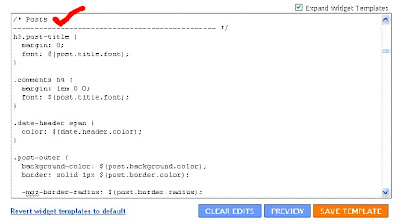
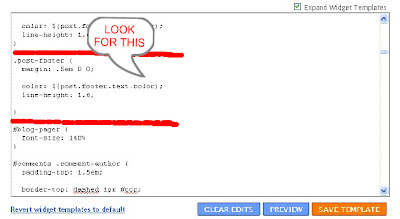
Still in the Posts section, scroll down further until you find :
.post-footer {
margin: .5em 0 0;
color: $(post.footer.text.color);
line-height: 1.6;
}
(or something similar)
Directly in front of that last bracket } is where the new code goes. Your new code needs to end with the bracket to close the code and so it can be read properly. You are NOT deleting or replacing any HTML code, just adding.
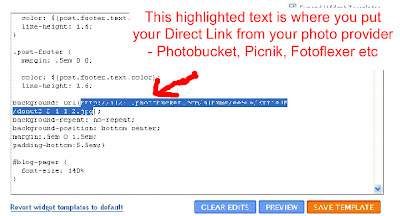
*New Code* background: url(PUT YOUR URL IN HERE);
background-repeat: no-repeat;
background-position: bottom center;
margin:.5em 0 1.5em;
padding-bottom:1.5em;
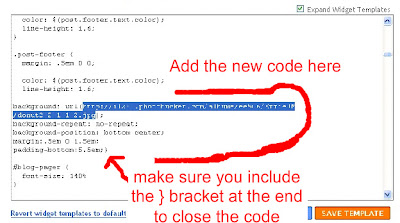
The highlighted text is where you will put your
URL code, either from the divider you are using or from the divider you have created.
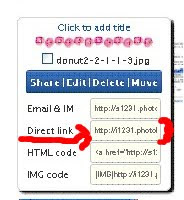
I created mine using Photobucket. You need to use the
Direct link. You just hover over your picture and the menu will appear. Just click on the link and it will say copied. Then just paste it into your new code.
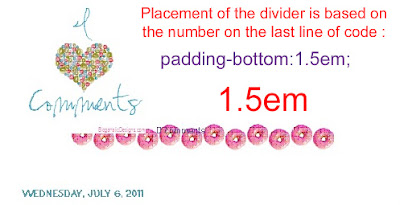
Another small problem I had was the placement of the divider. It was up too high as you can see in the photo. This was because of the last line of the code 1.5em.
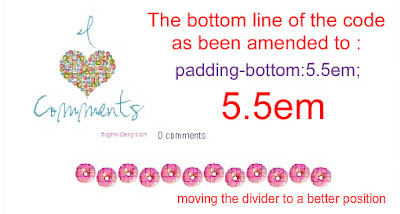
Once I changed the code to
5.5em, it was in the perfect place. You can change it to 2.5, 3.5 and so on.
Before clicking on the
Save Template button, click the
Preview button so you can see what it will look like to make sure you are happy with the size etc.
*Extra Note* There is also another code (that starts with #main-wrapper that I can never find) to see how big / wide your divider should be. Shabby blogs makes all of theirs at 650 pixels so they are easily reduced. My final divider is a width of 350 with a height of 40, but this is because it is the size that I like. You may need to play around to get your size just right :)
I hope this makes sense and may help someone who is having trouble finding those codes that I can never find.


 Still in the Posts section, scroll down further until you find :


 Once I changed the code to 5.5em, it was in the perfect place. You can change it to 2.5, 3.5 and so on.
Thanks for the useful info. I've had the same frustrating problem, but will certainly take your advice. Very cool.
ReplyDeleteHi Jane, great tutorial! I've never thought about adding a post divider, but if I'm gonna do it, I know where to come! Cheers Christie (visiting from Lucy's Drab to Fab!)
ReplyDelete